🛜 I Stopped Using VPN Gateways—Here’s How I Built a Multi-Cloud Network Instead

🚀 Building a Low-Cost Multi-Cloud Network with Tailscale (Azure + AWS + On-Prem)
For years, the default way to connect networks across environments—on-premises, Azure, AWS—has been through traditional site-to-site VPNs. You deploy a VPN gateway, configure IPSec tunnels, manage pre-shared keys, deal with routing quirks, and pay a fixed monthly cost whether you use it heavily or not.
It works. But it’s heavy, rigid, and for many small-to-medium businesses, unnecessarily expensive.
So I explored a different approach—one that removes the dependency on traditional VPN gateways entirely. Instead of building tunnels between networks, I focused on building a secure, identity-based network overlay using Tailscale, and combining it with native cloud routing mechanisms like VNet peering and VPC peering.
What came out of that is a fully functional, multi-cloud network that behaves like a site-to-site VPN—but is far more flexible and cost-efficient.
🧭 Architecture at a Glance
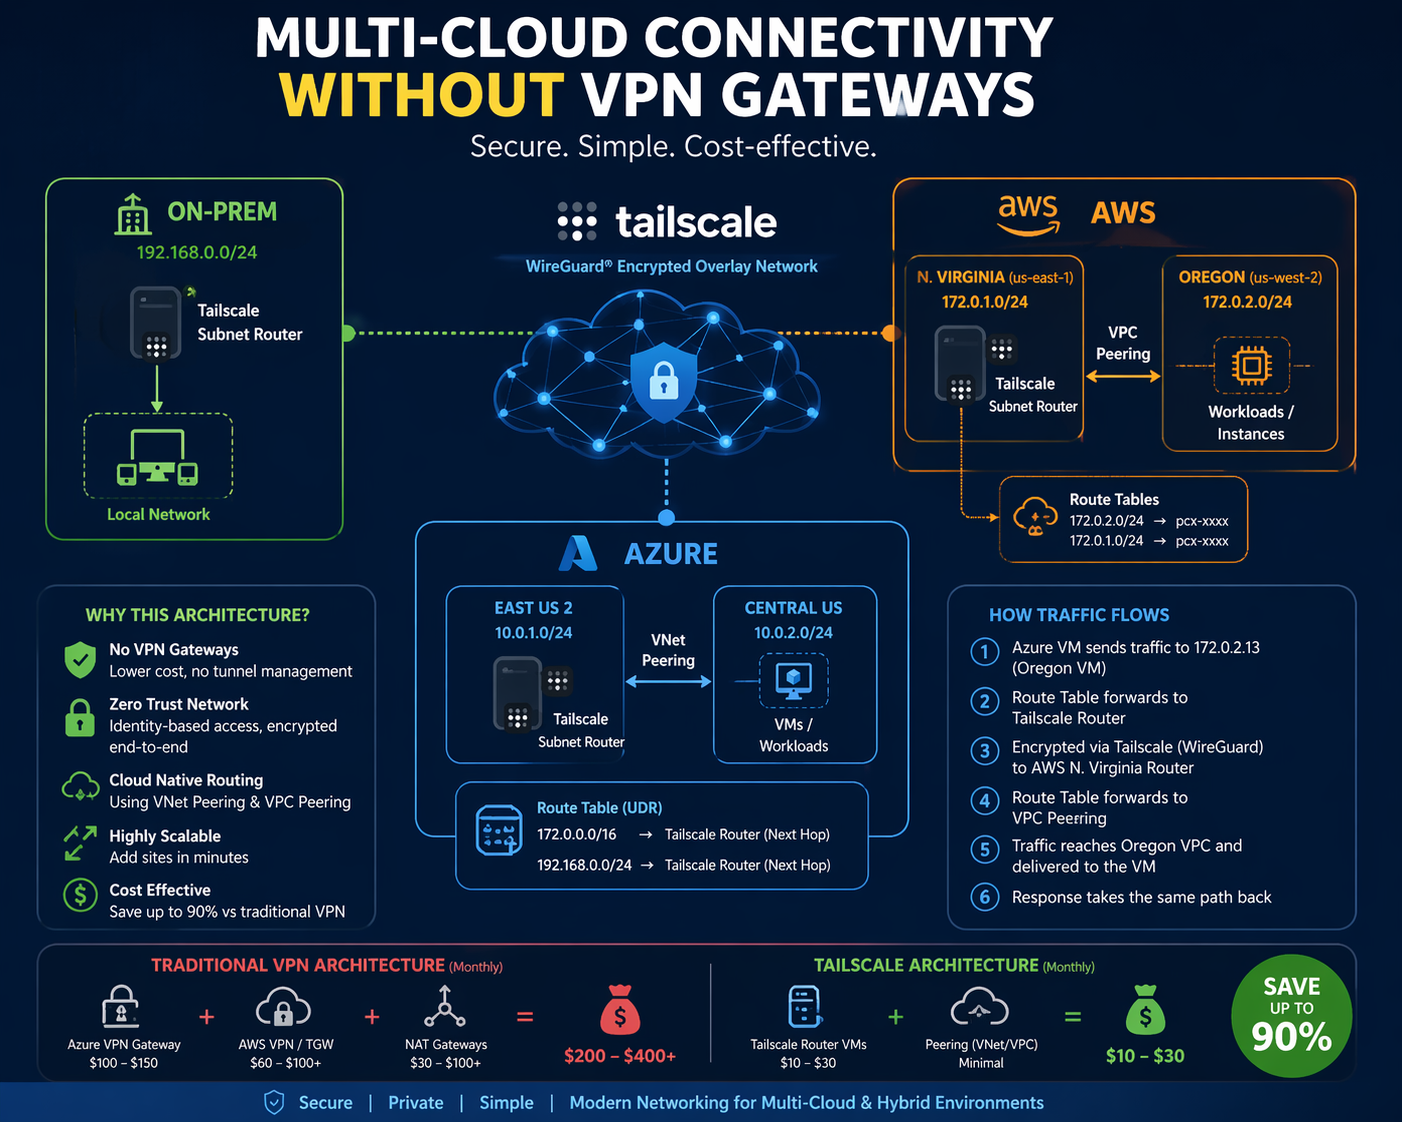
🌐 The Idea: Don’t Tunnel Networks—Overlay Them
At the core of this design is a simple shift in thinking.
Instead of asking:
“How do I connect Site A to Site B with a tunnel?”
We ask:
“How do I make all sites part of the same secure network, regardless of where they live?”
This is exactly what Tailscale does.
Tailscale creates a private mesh network across all participating nodes using WireGuard. Every node gets an identity and a private IP, and communication between nodes is encrypted end-to-end. There’s no central VPN gateway, no single choke point—just direct, secure connectivity between peers.
But the real power comes when you introduce subnet routers.
🔑 Turning Individual Nodes into Network Gateways
In a normal Tailscale setup, only the devices running Tailscale can communicate. That’s useful, but not enough when you want entire subnets—like 192.168.0.0/24 or 10.0.1.0/24—to be reachable.
This is where subnet routers come in.
By enabling route advertisement on a node, you essentially tell Tailscale:
“If anyone needs to reach this subnet, send the traffic to me.”
For example, on an on-prem server:
tailscale up --advertise-routes=192.168.0.0/24
Now, any device in the Tailscale network can reach the entire on-prem subnet through that single node.
The same concept applies in the cloud.
- In Azure, a VM advertises
10.0.0.0/16 - In AWS N. Virginia, another VM advertises
172.0.1.0/24
These nodes stop being just servers—they become routing points between the overlay network and their local environments.
But for this to work correctly, one critical setting must be enabled:
sysctl -w net.ipv4.ip_forward=1
Without IP forwarding, the node can receive traffic—but won’t pass it along.
☁️ Azure: Acting as the Aggregation Layer
In Azure, I used two VNets—East US and Central US—connected via VNet peering. This part is important because Azure peering provides high-speed, low-latency private connectivity between networks without needing a gateway.
Inside East US, I deployed a Tailscale router VM and advertised the Azure address space.
Now, Azure effectively becomes a hub in the design. It can reach:
- On-prem via Tailscale
- AWS via Tailscale
- Other Azure VNets via peering
To make this work cleanly, Azure uses User Defined Routes (UDRs).
For example:
Destination: 172.0.0.0/16
Next hop: Tailscale router VM
This ensures that any traffic destined for AWS is forwarded into the Tailscale overlay instead of being dropped or sent to the internet.
At the same time, Network Security Groups (NSGs) must allow traffic from the AWS and on-prem CIDRs. Without that, packets arrive—but never make it to the VM.
☁️ AWS: Where Routing Gets Interesting
AWS introduces a key constraint that shapes the design:
VPC peering is not transitive.
This means AWS will not automatically route traffic from one VPC to another through a third VPC.
So if you have:
- N. Virginia (
172.0.1.0/24) - Oregon (
172.0.2.0/24)
Even with peering in place, traffic won’t magically flow across multiple hops.
To solve this, I used the N. Virginia Tailscale router as a controlled transit point.
Here’s how it works in practice.
When Azure wants to reach a VM in Oregon:
- The packet is sent to the Azure Tailscale router (via UDR)
- It enters the Tailscale network (encrypted)
- It reaches the AWS N. Virginia router
- That router checks its route table:172.0.2.0/24 → VPC Peering (pcx-xxxx)
- The packet is forwarded across the peering connection into Oregon
The return path follows the same logic in reverse.
This works not because AWS allows transitive routing—but because the N. Virginia router is acting as a Layer 3 forwarding device, making an explicit routing decision.
🏠 On-Prem: No Static IP, No Problem
On the on-prem side, things are surprisingly simple.
A single machine running Tailscale advertises the local subnet:
tailscale up --advertise-routes=192.168.0.0/24
That’s it.
There’s no need for:
- Static public IPs
- Port forwarding
- Edge firewall changes
Tailscale handles NAT traversal automatically. Even behind typical ISP setups, the on-prem network becomes fully reachable from Azure and AWS—securely and privately.
🔐 Security: Identity Over Perimeter
Traditional VPNs rely heavily on network boundaries—if you’re inside, you’re trusted.
This design flips that model.
- Every connection is encrypted using WireGuard
- Every node is authenticated via identity
- Access can be restricted using Tailscale ACLs, Azure NSGs, and AWS Security Groups
Instead of trusting a subnet, you trust who and what is connecting.
💰 Cost: Where This Really Shines
In a traditional setup, just enabling connectivity between Azure and AWS could require:
- Azure VPN Gateway
- AWS Site-to-Site VPN
- Possibly a Transit Gateway
- NAT Gateways for outbound access
Even a basic setup can easily exceed $200–$400 per month, before considering data transfer.
In this design, the only real cost is:
- A few small VMs acting as routers
- Minimal peering costs
- Tailscale (often free or low-tier)
That brings the cost down dramatically—often to under $30/month for the same functional outcome.
⚖️ What This Design Really Is
It’s tempting to call this a “site-to-site VPN,” but that’s not entirely accurate.
There are no static tunnels. No IPSec. No centralized gateways.
Instead, this is:
A multi-cloud, identity-based network built using an encrypted overlay (Tailscale) and native cloud routing (peering + route tables).
It behaves like a site-to-site network—but it’s far more flexible.
🧩 Scaling and High Availability
As demand grows, this design can evolve.
You can deploy multiple subnet routers advertising the same CIDR. Tailscale will automatically choose the best path, providing failover without complex routing protocols.
In cloud environments, you can go further:
- Azure VM Scale Sets
- AWS Auto Scaling Groups
High availability becomes a matter of adding more routers, not redesigning the network.
🏁 Final Thoughts
What started as an experiment turned into a clear realization:
You don’t always need heavy, traditional VPN infrastructure to build a secure, multi-site network.
By combining:
- Tailscale for secure overlay connectivity
- Cloud-native peering for efficient intra-cloud routing
- Proper route table design for traffic control
You can build a network that is:
- Secure
- Flexible
- Cost-efficient
- Multi-cloud ready
And most importantly—simple enough to deploy and manage without overengineering.
If you’re exploring hybrid or multi-cloud networking, this approach is worth considering. It challenges the default assumptions—and in many cases, delivers a better outcome with fewer moving parts.